 |
 |
|
|
Special thanks to Greg Pennell for the article and diagrams for this wrapper.
After
browsing through several rod building catalogs and websites, I figured out what
I wanted in a rod wrapper and decided to build my own.
I selected poplar hardwood from my local Lowe’s Home Improvement Store,
but you can use pine, maple, oak, or whatever you prefer.
Total cost for my wood and the necessary hardware was a little over
$15.00. If you’ve checked the prices for simple rod wrappers in
some supply catalogs, you’ll see a significant savings.

Materials List:
1”x3”x24”
hardwood (2 pieces)
1”x2”x24”
hardwood (1 piece)
1”x4”x36”
hardwood (1 piece)
1/4”x2”
bolts, with washers and wing nuts
1/4”x3”
bolts, washers, and self locking nuts
1
1/4” drywall screws
Wood
glue
Felt
Stain
and finish of choice
Step 1, The Base
From
the 1x2, cut three pieces 5 1/4” long. Put
one aside for later. take the two
remaining pieces, and glue/screw them to the bottom of the two 1x3 pieces,
leaving about a 5/16” gap between the two 1x3’s.
Be sure to pre-drill and countersink all screw holes to keep from
splitting the wood. Set this aside
to allow the glue to dry.
(Photo 1)

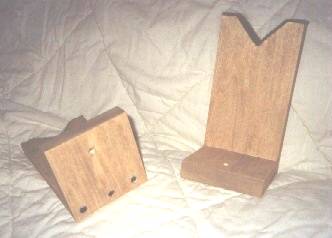
Step 2, The Rod Rests
From
the 1x4, cut three pieces 6” long, and two pieces 4” long.
Set one of the 6” pieces aside for later.
Take the two remaining 6” pieces and clamp them together.
Mark and cut a “V” notch 1 1/2” deep in one end.
Then Glue/screw the uprights (6” pieces) to the 4” pieces. Drill a 5/16” hole in the center of each of the 4” bases.
(Photo 2)
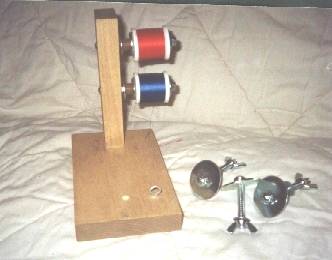
Step 3, Thread Tensioner
Now,
take the two pieces you set aside earlier.
Drill two 1/4” holes in
the piece of 1x2, far enough apart so two spools of wrapping thread won’t hit
each other. On mine, they are 2”
apart. Glue/screw the 1x2 to one
edge of the piece of 1x4. Drill a 5/16” hole in the center of the 1x4, about 2”
from the edge.
Thread
the 3” bolts through the two holes in the upright, and secure them with a nut.
These will hold your spools of wrapping thread.
Tension on mine is supplied by two small pieces of surgical tubing (small
springs will also work) I had to
use the self-locking nuts because the wing nuts I tried kept un-screwing
themselves as the spools turned.
Washers
cut from a thin piece of plastic, and placed on both ends of the thread spools
help the thread spools to turn smoothly. I
added a small eye screw to the base to feed the thread from the bottom of the
rod blank.
(Photo 3)
Step 4, Finishing/Assembly
Sand
lightly (if you feel ambitious, you can use a router on all the edges), stain,
and apply a coat of you finish of choice. I
just sprayed mine with a couple of light coats of matte polyurethane.
Glue felt (or the fuzzy half of Velcro) to the “V” notches in the rod
rests. I put some on the base to keep from scratching the kitchen
table, too.
Then
use the 2” bolts, washers, and wing nuts to connect the rod rests and thread
tensioner to the base. The slot you
built into the base is for your adjustments of these three pieces.
You
should have enough excess wood left to make a separate rod rest (for longer
sections or one piece rods). I’m
going to make an extra upright for mine, and attach a drying motor, for
finishing.
(Photo 4)

Simple Rod Jig ..not nearly as nice as the one above

Rod Building jig
Use 1/2 inch plywood or lumber to make your jig. Distance between V's should be about 24 inches. Height to bottom of V's should be 6 to 10 inches above middle board. Place felt in V's so rod blank does not get scuffed.
This is a simple diagram of a rod building jig. Fancy jigs can be made with rollers and a power motor to spin the rod while tying. They are also available for $100-200 commercially.